Hello Coders, In this blog, you will learn to make a form in HTML. Creating a form is very easy in HTML when you know the full elements and tags of the form.
A form is a powerful element that helps us to interact with the user. It is used to collect data from the user and send it to the server where the owner of the form can see the data. A form consists of various types of fields such as Name, Username, Password, Email, Phone number, Radio buttons, Checkbox, and many more fields.
A form is a powerful element that helps us to interact with the user. It is used to collect data from the user and send it to the server where the owner of the form can see the data. A form consists of various types of fields such as Name, Username, Password, Email, Phone number, Radio buttons, Checkbox, and many more fields.

The steps to create a form are:-
- Open a text editor of your choice and type all the basic HTML tags such as HTML, Head, Title, and Body.
- To create a form in HTML we will use the <form> tag in the body section and close it with the </form> tag. This is the tag that tells the browser that the form is needed here. So your code will now look like this:-
<form>
</form> - So now that your form tag is ready, we will now add two text fields which will be First name and Last name. Syntax to add the first name and last name are:-
First name: <input type=”text” name=”Firstname” placeholder=“First name”>
Last name: <input type=”text” name=”lastname” placeholder=“Last name”> - After adding the name fields we will add a radio button for asking the gender of the person. The syntax for this is:-
Gender
<input type=“radio” name=“gender” value=“male”> Male
<input type=“radio” name=“gender” value=“female”> Female - Now we will add a Checkbox field for the person to ask about his/her qualification. The for which is:-
Qualification
<input type=“checkbox” name=“quali” value=“10 Pass”>10th Pass
<input type=“checkbox” name=“quali” value=“12 Pass”>12th Pass
<input type=“checkbox” name=“quali” value=“graduate”>Graduate - We will now add a field for Phonenumber which is the same as the first name field we added. The syntax to add a phone number is:-
Phone Number: <input type=“number” name=“phonenumber” placeholder=“Phone Number”> - The last field we will add is the password, So the syntax to add a password field in HTML form is:-
Password: <input type=“password” name=“password” placeholder=“Password”> - The last thing left in the form now is the submit button, It will help the user to submit their data to the owner of the form. So the syntax to create a submit button in the form is:-
<input type=”submit” value=”submit” name=”submit”> - Now that all the elements of your form are ready. Combine them in one sheet and close the body and HTML tag.
- Save your file will .html extension and run it.
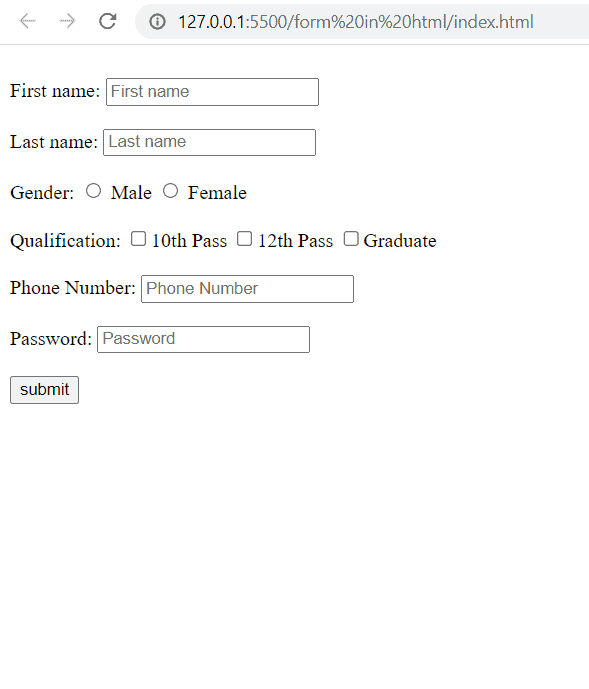
- Your code and output will look like this:-
Index.html
<!DOCTYPE html>
<html lang=”en”>
<head>
<title>Browser</title>
</head>
<body>
<br>
<form>
First name: <input type=”text” name=”Firstname” placeholder=”First name”>
<br><br>
Last name: <input type=”text” name=”lastname” placeholder=”Last name”>
<br><br>
Gender:
<input type=”radio” name=”gender” value=”male”> Male
<input type=”radio” name=”gender” value=”female”> Female
<br><br>
Qualification:
<input type=”checkbox” name=”quali” value=”10 Pass”>10th Pass
<input type=”checkbox” name=”quali” value=”12 Pass”>12th Pass
<input type=”checkbox” name=”quali” value=”graduate”>Graduate
<br><br>
Phone Number: <input type=”number” Name=”phonenumber” placeholder=”Phone Number”>
<br><br>
Password: <input type=”password” name=”password” placeholder=”Password” >
<br><br>
<input type=”submit” value=”submit” name=”submit”>
</form>
</body>
</html>
OUTPUT
Hope this blog was helpful to you. Now that you have learned the basics of how to create a form. You are now ready to go one step forward so you can now learn how to create a Registration Form in HTML and Create a Login page in HTML. Both of the questions use the properties of the form.
Hope this blog was helpful to you. Thank you for visiting our blog. If you have any doubts related to this or any other. Let us know in the comments section we will answer it as soon as possible.