Hello Coders, In this blog post, you will learn to create a table in HTML with border.
Before you do anything fancy on the table, You need to know about a table. A table consists of rows and columns, which are used to add different types of data such as Text, Numbers, Images, Links, and Dates.
This (<table> …. </table> ) tag is used to create a table. Each row in the table is made with the <tr> tag and the data in these rows are filled by the <td> tag.
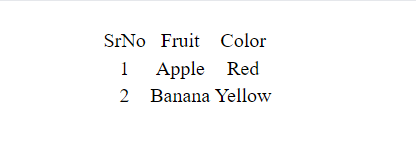
Code to make a simple table in HTML:-
<table>
<tr>
<td>SrNo</td>
<td>Fruit</td>
<td>Color</td>
</tr>
<tr>
<td>1</td>
<td>Apple</td>
<td>Red</td>
</tr>
<tr>
<td>2</td>
<td>Banana</td>
<td>Yellow</td>
</td>
</table>
Output
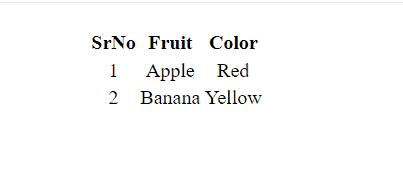
A simple Table with th tag
There is also a <th> tag which is used to define the header cell in the table. <th> tag Bolds and center align that particular element of the cell where this tag is used.
Code to use <th> :-
<table>
<tr>
<th>SrNo</th>
<th>Fruit</th>
<th>Color</th>
</tr>
<tr>
<td>1</td>
<td>Apple</td>
<td>Red</td>
</tr>
<tr>
<td>2</td>
<td>Banana</td>
<td>Yellow</td>
</td>
</table>
Output
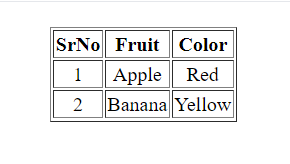
A Table with a simple Border
To add a border in the table border attribute is used in the <table> tag. Border Makes the table easy to understand and makes it looks good.
Syntax to use the border with the table:-
<table border=”2”>
<tr>
<th>SrNo</th>
<th>Fruit</th>
<th>Color</th>
</tr>
<tr>
<td>1</td>
<td>Apple</td>
<td>Red</td>
</tr>
<tr>
<td>2</td>
<td>Banana</td>
<td>Yellow</td>
</td>
</table>
Output
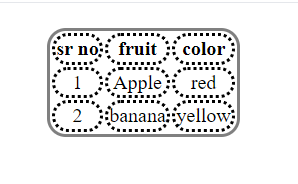
Styling the Border of a Table
Now that you know how to create a table border in the HTML. You can now style that border with the help of the border-style property of the table. There are many different ways which are:- Dashed, Dotted, Solid, Double, Groove, Ridge, Inset, Outset, and None.
The syntax for border style:-
<head>
<style>
table{
border-style: solid;
}
th,td{
border-style: dotted;
}
</style>
</head>
<body>
<table>
<tr>
<th>sr no</th>
<th>fruit</th>
<th>color</th>
</tr>
<tr>
<td>1</td>
<td>Apple</td>
<td>red</td>
</tr>
<tr>
<td>2</td>
<td>banana</td>
<td>yellow</td>
</td>
</table>
Output
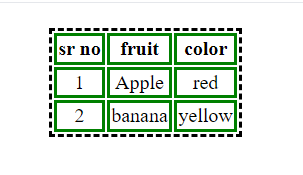
Creating a Rounded Table Border
To add a rounded border in the table Border-radius Property is used under table, td, th tag under the style tag. We can different radii of the Border with the help of this.
Syntax to add the border-radius is:-
<head>
<style>
table{
border-style: solid;
Border-radius: 15px;
}
th,td{
border-style: dotted;
Border-radius: 15px;
}
</style>
</head>
<body>
<table>
<tr>
<th>sr no</th>
<th>fruit</th>
<th>color</th>
</tr>
<tr>
<td>1</td>
<td>Apple</td>
<td>red</td>
</tr>
<tr>
<td>2</td>
<td>banana</td>
<td>yellow</td>
</td>
</table>
Output
Adding Different Colour to Border
Now that you are an expert in styling and creating a border. You can also add different colors to your border. Border-color attribute is used to add different colors to the border. It is used in the tr,td tag under the style tag.
Hope this blog post was helpful to you and you have got the answer to your question. Thank you for visiting our blog. If you have any doubts about any coding questions then let us know in the comments section we will answer them as soon as possible. Till then check out our more blog posts.